 Contact
 Andy's Parts Smarts
 Cart
Cart
Hello, Sign In!
EIBACH LOWERING SPRINGS INSTALLATION ON A THUNDERBIRD

For this installation I have chosen the Eibach Pro Kit springs which offer chrome silicon heat-treated steel
that is powder coated for a lifetime of protection. Eibach also offers the Sportline springs which are a lower drop, but
since I live in an area that has speed bumps and a lot of road construction I chose the Pro Kit. This How-To will describe
the removal and installation of the stock springs, struts, and shocks. Please refer to shop manuals as reference and ALWAYS
support the vehicle properly!
Rear Installation:
Raise and support rear of vehicle with jack stands and/or blocks.
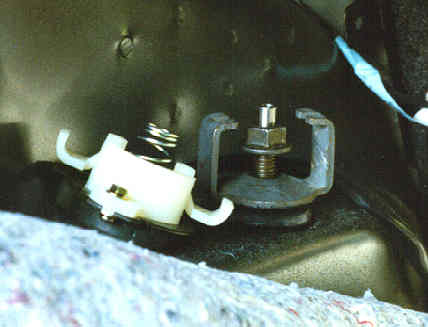
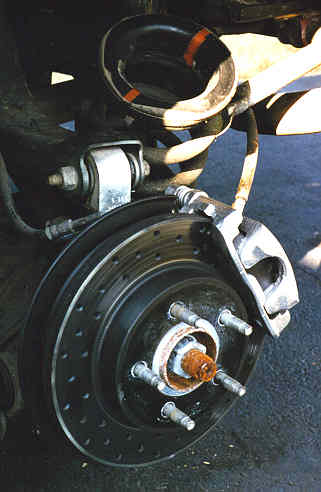
Remove both rear shock absorber electronic actuator (if equipped) from the shock towers. Then remove the single
nut that holds the shock in place (see picture).
Remove rear wheels from vehicle.
Remove the shock nut and bolt from the lower rear suspension arm and remove the shock assembly from the vehicle.
Using a floor jack placed under the rear suspension arm compress the spring so you can remove the sway bar end links.
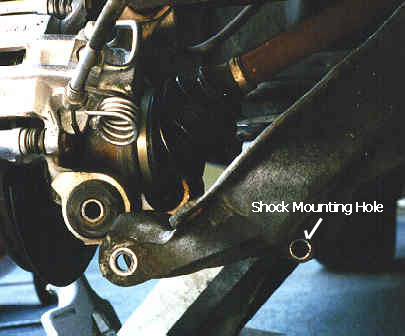
Next lower the jack down so it just supports the suspension arm then remove the nut and bolt that holds the rear wheel knuckle to
the rear suspension arm (see picture). You may have to tap the bolt out of the rear wheel knuckle.
Lower the floor jack and rear suspension arm to release the tension from the rear spring. Once the lower suspension
arm is free place your feet on it and push down so the rear spring can be removed.
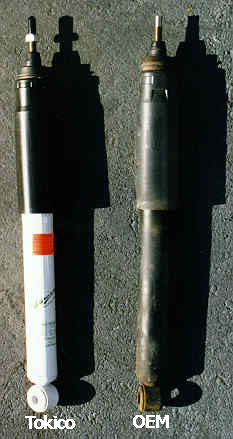
With the rear shocks and springs out you are now ready to install the new shocks and springs.
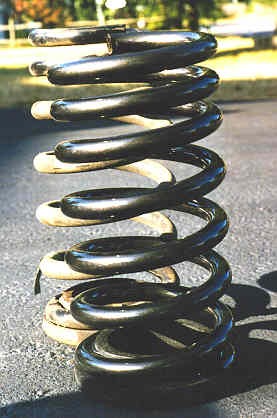
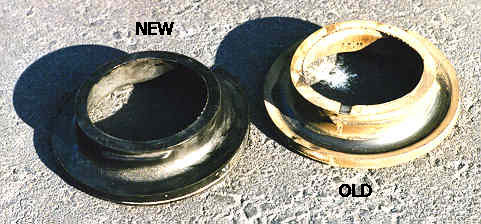
The rear spring insulators (2 per spring) compress and should be replaced if possible when the new springs are
installed (see picture). Grease the new insulators with white lithium grease or similar to prevent suspension squeaking.
Install the new springs (spring pigtails may be in any position). Position jack under rear suspension arm and raise
until the lower suspension arm is lined up with the rear wheel knuckle bores. Ensure spring seats properly. Install bolt and nut
retaining rear suspension arm and bushing to rear wheel knuckle and tighten bolt to 110-148 lb-ft. Install sway bar end link and
bushing. Lower the jack and check spring positioning.
Turn the shock up side down and compress then insert the shock into the rear tower. Install lower shock absorber
bolt, washer and nut tighten to 83-113 lb-ft. With the upper end of the rear shock absorber protruding through the body shock
tower hole, install the insulator, washer and nut assembly. 27-40 lb-ft (with ARC) 44-58 lb-ft (without ARC)
Re-install both rear shock absorber electronic actuator (if equipped).
Front Installation:
Remove both front absorber electronic actuators (if equipped) from the strut towers. Then remove the outer three
upper strut retaining nuts (see picture). DO NOT REMOVE THE CENTER NUT!
Then raise and support the front with jack stands and/or blocks. It is a good idea to leave the other wheel on
until you are finished with the one side. Then reinstall the wheel and start on the other side.
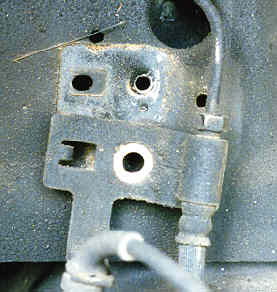
Next remove the lower strut mounting bolt & nut from the front suspension lower arm. Remove the bolt that holds
the bracket assembly for the brakes.
Then place a floor jack under the front lower arm and lift it to remove the tension on the sway bar end links
and remove the sway bar end link from the spindle using a ball joint remover. Then remove front wheel spindle to upper front
suspension arm ball joint retaining nut and bolt. With the spindle supported by the floor jack you can slowly lower the floor
jack. Be sure to hold the front spindle as it is lowered. Remove the strut/spring assembly.

Do Not attempt to compress the spring with a hand held spring compressor. Take the assembly to a local shop
and have them swap the springs for you. You will need a wall mounted strut/spring compressor.
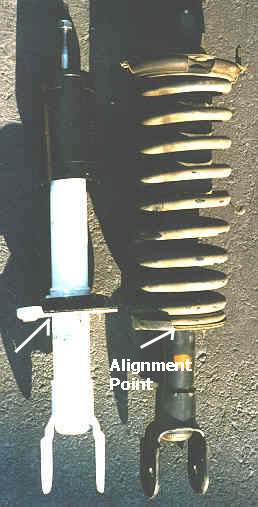
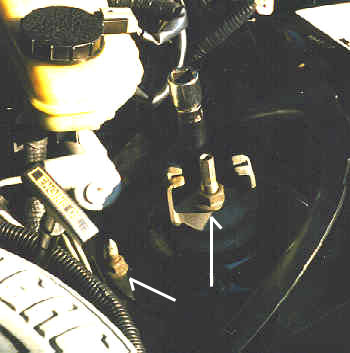
To ensure the spring is installed on the new strut cartridge assembly correctly use a 90 degree straight edge
and mark the top and bottom of the cartridge (see picture below) with a silver marker or paint. Use the Alignment Point on
the strut cartridge as the fixed point (see picture above).
Install the new cartridge assembly back into the strut tower. Install shock absorber housing seal and three
outer strut retaining nuts (hand tighten). Adjust the height of the floor jack to allow the lower strut assembly and lower
control arm to align then insert the bolt and tighten nut to 125-170 lb-ft. Align the spindle to upper control arm and insert
bolt and tighten nut to 50-68 lb-ft. Install the sway bar end link and tighten nut to 30-39 lb-ft. Tighten the three outer
strut retaining nuts to 17-22 lb-ft. Re-attach the brake line bracket to the frame. Install wheel and start on the other side.
After you are finished you will have to take the car to a alignment shop for a 4 wheel alignment.
