 1-800-419-1152
 Contact
 Andy's Parts Smarts
 Cart
Cart
Hello, Sign In!
PROGRESS REAR ANTI-SWAY BAR INSTALLATION ON A 2001 FORD FOCUS ZX3
- (Anti-sway bar can also be called a 'sway bar' and 'anti-roll bar')
- Time to Complete: 1 hr (+ 1 hr if do optional painting of U brackets)
- Tools Required:
Floor jacks and jack stands
13mm and 14mm sockets and wrenches
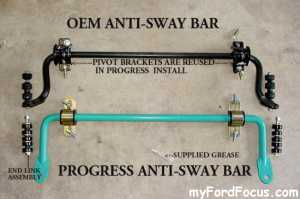
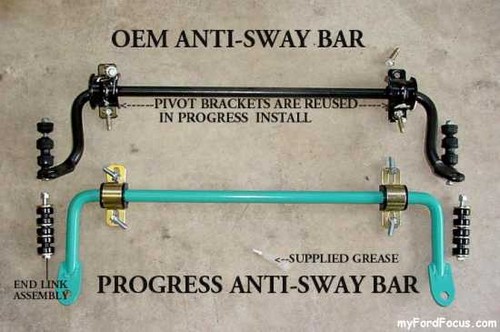
3M Finishing Pad, Primer paint and red paint(optional) - Benefits: The Progress Technology 22 mm anti-sway bar (rear) is well manufactured, has a teal colored powder coated finish and is supplied with polyurethane bushings/end link assemblies. The OEM anti-sway bar is 20 mm in size and uses a soft rubber pivot bushings and end link assemblies. The Progress anti-sway bar improves the handling of the car due to the larger size of the bar itself and by eliminating the less compliant (soft) OEM bushings/end assemblies.
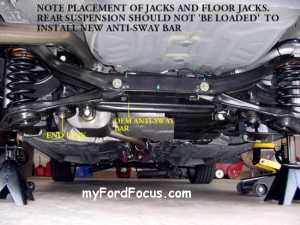
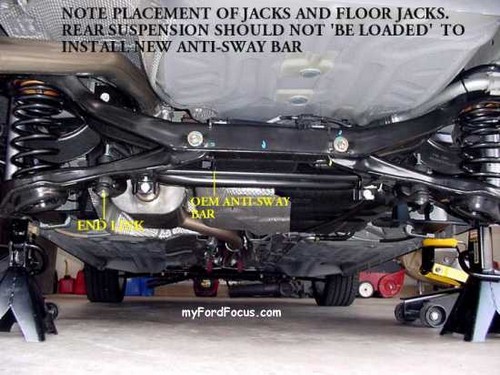
- NOTE: This is an easy install, but does require jacking up rear of car and removing both rear wheels. Safety first! If you do not have access to a lift you then need (2) 3+ ton rated floor jacks and (2) 3 ton rated floor jack stands.
- Instructions: (Click Images to Enlarge!)
- The Progress anti-sway bar comes with all necessary parts (U brackets, polyurethane bushings/end link assemblies, bolts, cup washers, and grease tube) needed for the anti- sway bar installation.
- The instructions are clear and complete with the one exception dealing with the tightening of the end link assembly. The instructions state "Tighten the end link until you cannot rotate the cup washer by hand, then one more full turn. DO NOT over-tighten and the end links!" It could be just my bias, but when something is place in caps 'DO NOT..' and sentence is ended with '!' I would prefer a little more explanation of consequences and inclusion of a picture showing a correctly installed end link.
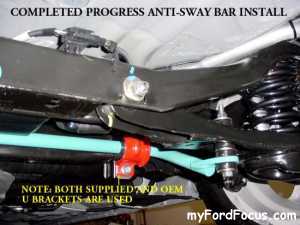
- Another minor point... when installing the Progress supplied U brackets for the pivot joints the instructions state "Using the stock (OEM) hardware, attach the bar and brackets to the stock mounting locations" and what they mean (but not state specifically) by 'OEM hardware' is reusing the OEM sway bar 'U' brackets.
- Since the Progress anti-sway bar install instructions are reasonably complete (noting the before mentioned caveats) I will not repeat, but rather expand on a few points or techniques of the sway bar install process including my optional painting of the U brackets.
- * I did not use a car lift so the usage of jacks and jack stands was required. SAFETY is of utmost importance! Never work under a jacked up car without having the jacks backed up with proper rated jack stands!
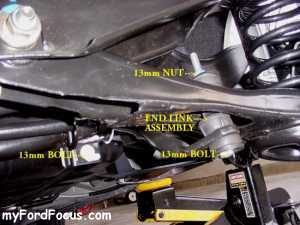
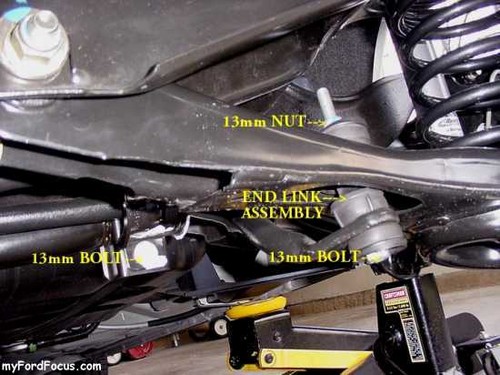
- * To remove the OEM anti-sway bar you will need 13mm socket set and a 13mm box wrench. First remove the 13mm nut and bolt of each end link assembly. Push arms of sway bar downward to release end links. Now remove the (2) 13mm bolts holding on each U bracket and bar falls off. Salvage the OEM U brackets for reuse. As you can see in this picture, the OEM end bracket assembly has soft rubber grommets as compared to the much firmer Progress polyurethane grommets. Click Images to Enlarge!
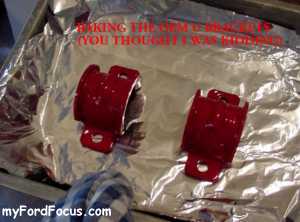
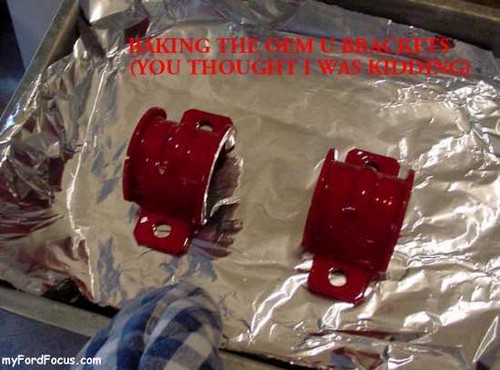
- * This step is optional and serves only as a visual enhancement. Take the OEM U brackets and rub down with a 3M Finishing Pad. Apply several coats of automotive primer and then finish with several coats of a high quality gloss paint (red in my case). Now bake brackets at 250? F for 45 minutes; this last step cures the paint. Click Images to Enlarge!
- * Prior to beginning in the Progress anti-sway bar install, install the 'D' shaped polyurethane bushing onto the bar. Use the supplied grease to fully lubricate the bushing part that contacts the bar prior to snapping bushing onto bar.
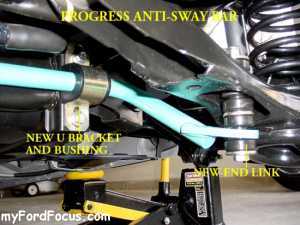
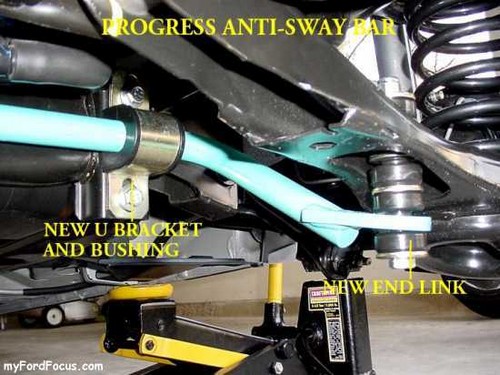
- * Install Progress anti sway bar by first attaching the supplied U brackets onto the 'D' shaped bushing and bolting onto car with supplied bolts. Bolts are loosely installed since you will be removing to install the OEM U bracket over them. Now install end link assemblies (requires a 13mm and 14mm socket and wrench) following the instruction's graphic showing the end link grommet pattern. Click Images to Enlarge!
- * To complete the install remove bolts holding U bracket in place (do one bracket at a time) and place OVER supplied U bracket with bushing the OEM U bracket. Once both U brackets are installed tighten all bolts following the instructions.
- The Progress Anti-Sway bar is now installed. The Progress bar was installed as part of the installation of the Eibach Pro Damper suspension upgrade therefor the pictures show the Eibach coils and shocks. Click Images to Enlarge!
