 1-800-419-1152
 Contact
 Andy's Parts Smarts
 Cart
Cart
Hello, Sign In!
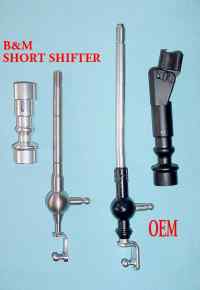
B&M SHORT SHIFTER
- Benefits: The B&M is a high quality shifter system (turned steel lever, billeted aluminum lock out sleeve and aluminum shift knob. (Note: the shift knob beautifully machined, but do not like the feel of metal shift knobs so I reinstalled the OEM knob and it works fine with the B&M parts.)
- Compliments of myFordFocus.com Forum Member: 20/20
- Time to Complete:1.5 hours
- Tools Required:
Needle nose and standard pliers
Small hammer
T20 Torx driver
Slotted screw driver (medium size)
Phillips screw driver
Nylon/plastic putty knife
Instructions:
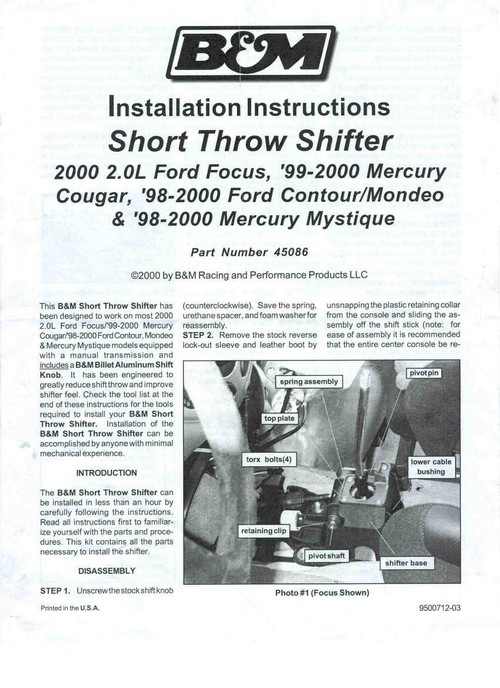
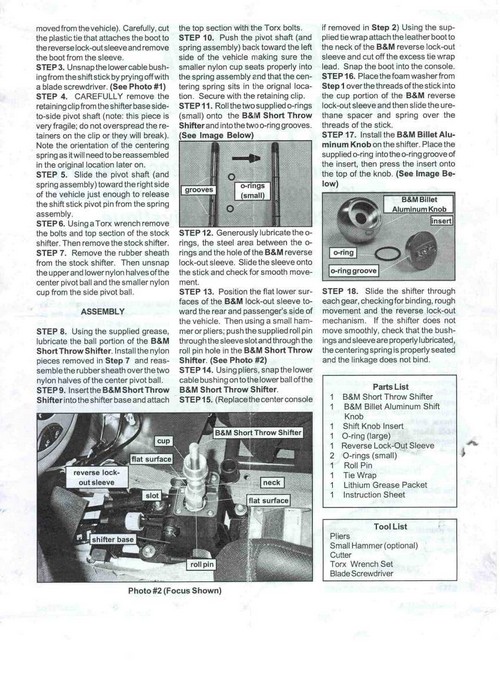
The B&M Short Shifter kit comes with all necessary parts needed (some of the OEM parts are reused) for the shifter installation. A special tube of Lithium grease is also included. Instructions are clear with the exception on how to remove the center console. In the instructions it states (Note: for ease of assembly it is recommended that the entire center console be removed from the vehicle) and in my opinion I do not see how the install can be accomplish without removing the center console. Since the B&W install instructions are complete I will not repeat, but rather detail the center console removal and expand on a few points of the shifter install process.
The B&M Short Shifter kit comes with all necessary parts needed (some of the OEM parts are reused) for the shifter installation. A special tube of Lithium grease is also included. Instructions are clear with the exception on how to remove the center console. In the instructions it states (Note: for ease of assembly it is recommended that the entire center console be removed from the vehicle) and in my opinion I do not see how the install can be accomplish without removing the center console. Since the B&W install instructions are complete I will not repeat, but rather detail the center console removal and expand on a few points of the shifter install process.
- 1. The center console is held in place with 3 phillips head screws. Remove two front cup holder inserts and a small circular cover just in front of the rear cup holder and screws are located there. If the console has a armrest (2001 ZX3 comes with armrest) you need to remove it also. Just behind the armrest pivot is a square curved cover and to remove just pop off by gently pulling back on it. Once remove there are two phillips head screws hold armrest base in place. Remove screws and armrest will slide off (as a separate piece from center console).
- 2. Now using the plastic putty knife carefully push in and lift up around the shift lever boot and boot retainer clips will release from console.
- 3. Unscrew (counterclockwise) the shift knob and remove knob and lock out spring/urethane spacer for later use.
- 4. Remove plastic lock-out sleeve (with boot attached to it), lift up boot (so it is 'inside out') and carefully cut nylon tie wrap that holds boot to lock-out sleeve (a replacement tie wrap is included with the B&M kit).
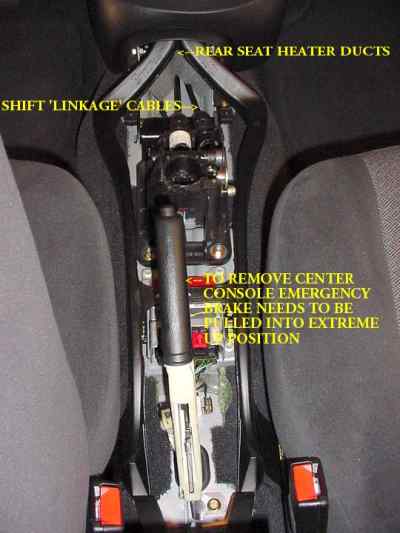
- 5. Pull emergency brake to its maximum up position (this means past the point where you would normally set the brake in day to day use).
- 6. Lift console up first from the back end and slip emergency brake boot off of the brake handle (there is not need to actually remove the boot from the console) and then lift front of console up and console is off. Release the emergency brake a bit since it is in an extreme position. (Click Photo 1 - To Enlarge)
- 7. At this point the B&M instructions take over. A few pointers though:
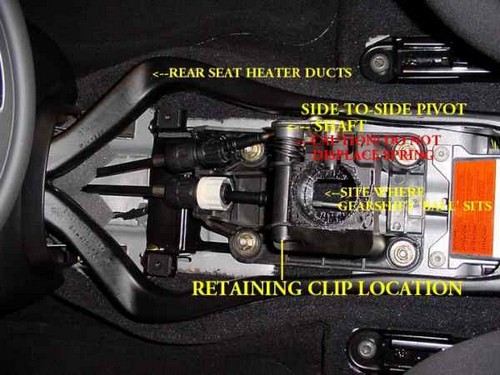
* Be VERY careful in removing the retaining clip from the shaft of the 'side-to-side pivot shaft'. The retainer clips are fragile so slowly push on clips of retainer while applying pressure (using nylon putty knife or a very thin slotted screw driver) to the back side of the retainer.(Click Photo 2 - To Enlarge)
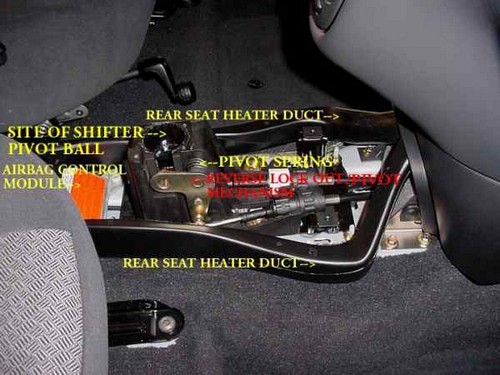
* Once retainer is off this allows the side-to-side pivot shaft to be moved so as to unclip it from the shift lever. Caution: do not push out too far since this would release the pivot spring from its seat. Move just enough to release from shifter. (Click Photo 3 - To Enlarge)
* When reassembling the B&M shifter with the OEM pivot ball make sure to use the provided grease generously. This might be the most difficult part of reassembling...slippery parts!
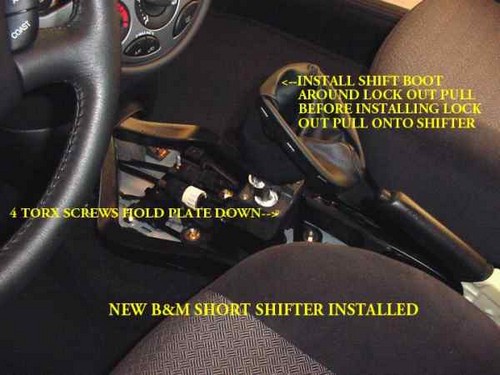
* Make sure you reattach (with the provide nylon tie wrap) the boot onto the B&M lock out sleeve BEFORE installing sleeve onto the shift lever (B&M instructions makes it look like you do AFTER installing lock out sleeve onto the shift lever). (Click Photo 4 - To Enlarge)
* For ease of installing the roll pin that holds to lock out sleeve to the shift lever, hold pin with a needle nose pliers and use small hammer to tap pin through the lock out sleeve into the hole of the shift lever.
- With the correct tools and not rushing things, the installation is not difficult overall. One last suggestion is that you try both the B&M and OEM knobs for feel.
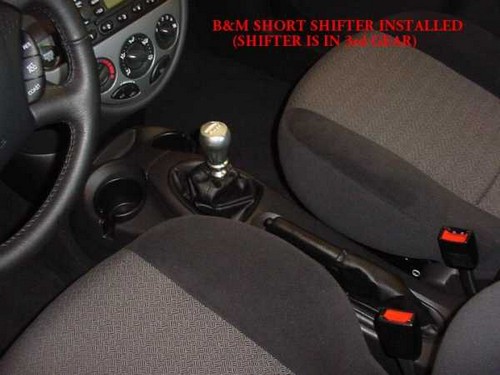
- I find the B&M shifter works 'as advertised' and considerably shortens shift throw distances and allows for more of a sporty shifting (particularly in 'heel and toe' mode) exercise.
