Contact
 Andy's Parts Smarts
 Cart
Cart
Hello, Sign In!
AEM INTAKE INSTALLATION ON A FORD FOCUS
- This Andy's Auto Sport how-to project is sponsored by AEM and MyFordFocus.com. AEM contributed this AEM cold air intake kit for the project car, and MyFordFocus.com helped with the install.
- Replacing your stock air intake with the AEM full length CAI kit is a bit more difficult than installing a "short" intake. However, it's still are fairly easy project that should take less than an hour to complete, half of that being the time it takes to remove the battery, the battery box and the stock intake system.
- Tools required: Flathead screwdriver, 6mm, 10mm, and 13mm sockets, T20 Torx Key(Included).
- Time to complete: 3/4 to 1 hour.
- Stock Air Duct/Box Removal:
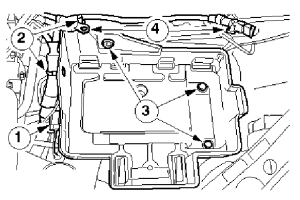
- 1. Remove the battery box top, simply pops off.
- 2. Disconnect your battery using the 10mm socket.
- 3. Remove the battery tie-down strap using the 10mm socket that screws into the bottom of the box.
- 4. Remove the battery from the car.
- 5. Remove the various wire harnesses that are attached to the side of the battery box. The pop out back through the walls of the box with stern push with your screw driver or something similar.
- 6. Using the 13mm socket, unbolt the battery box bolts and remove the box.
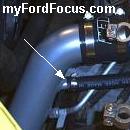
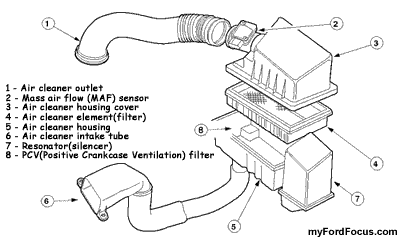
- 7. Using your screwdriver, remove the clamps that hold the upper air duct to the throttle body and MAF.
- 8. Disconnect the PCV tube from the side of the air box.
- 9. Pull the entire stock air box out, no need to disassemble the air box top. Pull Up!.
- 10. With the battery box and air box removed, you now have access to the lower air ducts.
- 11. Using the phillips screwdriver, remove plastic screws in the the stock snorkle duct, then remove the snorkle and lower air ducts.
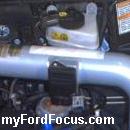
- 12. You are now ready to install the AEM CAI Kit
- 13. NOTE: You can leave your MAFS connected to the stock air box, but you will remove the sensor from the tubing and attach to the AEM tube next.
- AEM CAI Installation:
-
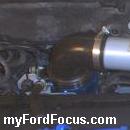
- 1. First, you need to remove the MAF sensor from the stock housing. Using the #20 Torx tool that comes with your new AEM kit. * Be very careful removing the sensor!
- 2. Install the MAF sensor onto the upper AEM tube and secure using the stock screws and #20 Torx tool.
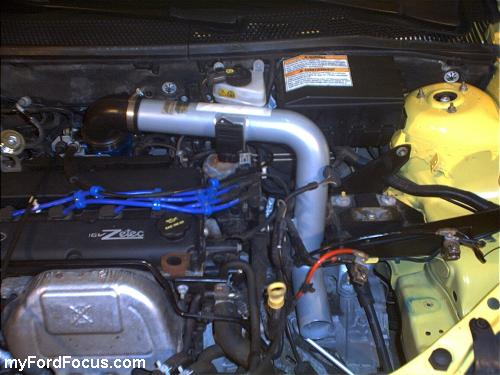
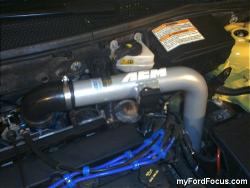
- 3. Install the larger end of the black 90 degree hose on the throttle body.
Install the 3.5" and 2.75" clamps on the respective ends of the hose, do not tighten it completely yet. - 4. Remove the 10mm bolt from the distributor coil pack bracket, and install the rubber mount.
Automatic transmission owners, use the 1" long rubber mount.
Manual transmission owners, use the 5/8" rubber mount. - 5. Install the 2nd rubber 1" rubber mount to the lower subframe of the car.
- 6. Install the upper AEM tube to the hose on the throttle body. Do Not tighten yet.
Line up the mounting support on the AEM tube with the rubber mount you installed on the distributor coil bracket.
Loosely tighten the bracket onto the rubber mount. - 7. Install the rubber connecting sleeve to the open end of the AEM upper tube.
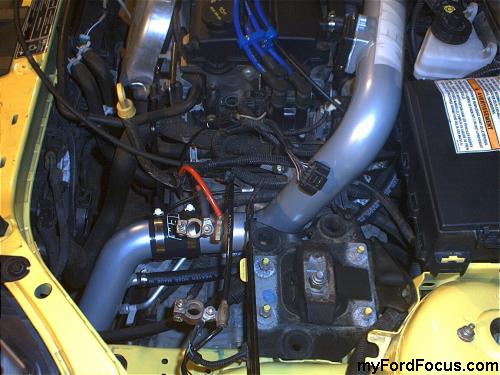
Install the supplied clamps onto the sleeve, do not tighten. - 8. Install the lower AEM tube from under the car, up to the sleeve on the upper tube.
NOTE: The instructions that came with your AEM kit says to have the car jacked up for this, but I was able to do this by just sliding under the car.
Automatic owners, the lower AEM tube is designed to go above the two transmission cooler lines, and below the power steering cooler line. - 9. Insert the lower tube into the rubber sleeve on the upper tube. Loosely tighten the clamps.
- 10. Fasten the lower tube's bracket tab onto the rubber mount you installed on the sub-frame. Again, loosely tighten the bolt.
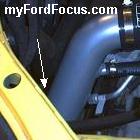
- 11. Install the 5/8" crankcase breather hose from the outlet on the valve cover to the connecter on the lower AEM tube. Have the 1" clamps on the tube first. Secure them tightly. Watch for any kinks in the hose.
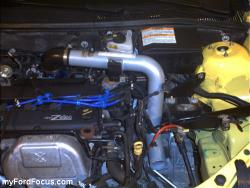
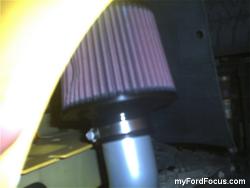
- 12. Install the AEM Filter on the end of the lower tube, just behind the fender.
NOTE: Make sure the filter is on the tube at least 2 inches and secure the clamp. If the filter moves at all, it's not on far enough, loosen the clamp and push the filter on farther. The filter should not move at all when clamped down - 13. Now check both AEM tubes for proper alignment, including at the throttle body. Make sure nothing is rubbing anywhere and that the mounts on the upper and lower tubes are on the two rubber mounts far enough so that you can secure them.
- 14. Secure the tubes on the two rubber mounts.
- 15. Tighten all your clamps.
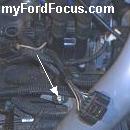
- 16. Reconnect the MAFS electrical connector.
- 17. Check all your connections again.
- 18. Re-install the battery box.
- 19. Re-attach the various wire harnesses that were attached to the side of the battery box.
- 20. Re-install the battery and secure.
- 21. Re-connect your battery terminals.
- 22. Start your car.
- 23. Let your car idle.
- 24. Drive your car as normal, and occasionally at WOT "wide open throttle". Your car's computer will make adjustments for the additional air that your car is getting.
- 25. Have Fun!!
Battery Box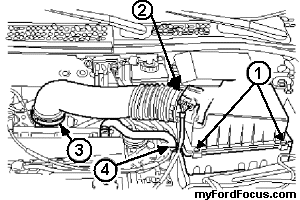
Stock Air Box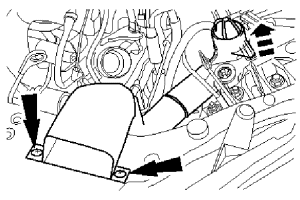
Stock Snorkle and Lower Duct